Question-answer: what is the correct half-fit?
Question-answer: what is the correct half-fit?
Question: My new instructor is explaining to me how to ride in a half seat, different from what I was taught before. The position of the lower body is not much different from what my previous trainer required me to do (sitting over the horse, heels down and wrapping my legs around the sides of the horse), but now I am being asked to flex my hips—my torso is almost parallel to the horse’s back. I was always taught not to bend at the hip, but simply to stand up in the stirrups. My hands were always at the horse’s neck at least halfway to the horse’s head in both landings. When I get into a half-stance like this, it seems to me that the horse will hit me in the face during the jump. What is the best fit?
Response: I guess, both coaches are trying to help you achieve the same goal. Different instructors use different methods and images to guide their students into correct, efficient posture. To find out which method works best for you, you need to supplement what you learn in training with information. To begin, consider carefully the definition and purpose of two-point landing exercises.
Half stance, jump stance, canter stance, and forward stance are terms that describe pretty much the same position that you achieve by lifting your seat out of the saddle, slightly closing your hip angle (30 degrees) and balancing your weight over your legs – “your two points.”
The two-point position is the top position in the posting trot and is used as an exercise to strengthen the half/jumping position. The ultimate goal is to keep your body in balance and balance so that you can move with your horse without leading or trailing him in any gait or jump, without pulling on the reins to keep you in place.
The purpose of the two-point position is to take your weight off your horse’s back, thereby giving him more freedom of movement, and to move his center of gravity forward to match his balance on the forehand. The faster the horse moves, the more weight it shifts to the front balance. When the horse goes over the obstacle, the two-point landing gives you the opportunity to follow his movements in the air. If your ankles, hips, and knees are flexible enough, all you have to do during the takeoff is allow your hip angle to close naturally as the horse comes up towards you. You don’t need to change anything.
Some trainers use a two-stage system to teach riders the half-stance. They first introduce the concept of lifting your weight out of the saddle by asking you to grab your mane and “stand in the stirrups”. This helps you process the feeling of lengthening down your legs and moving your weight down into your heels. Once you’ve settled on this feeling, you can move on to the second phase, during which the hip joint will close slightly and the upper body will be at the same angle as it is in the rising phase of the posting trot.
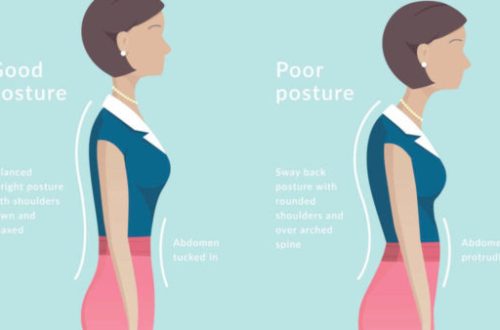
The initial position, when you are in the stirrups, is not a true two-point position because your body is not at the right angle to keep you in balance as the horse advances. On the other hand, there is the opposite extreme – the body is folded so that you are practically lying on the neck, forcing your balance ahead of the horse’s balance (now you are ahead of his movement). Perhaps your new trainer is teaching you to ride with an exaggerated hip angle to correct your previously overly upright upper body position. To find a happy middle, do the following exercise:
Trot along the arena, focusing on maintaining balance (hips over heels). Maintaining this position, move your hands back and place them on your hips or knees, allowing the rein to lengthen as needed (you will quickly regain control of the rein in this position). Keep your head up and focus on your horse’s ears.
When you can comfortably maintain this position without leaning forward or backward, return your hands to your neck. This time, place the brushes about one third of the way up the neck. (I find this hand placement helps keep the elbows soft and supple.) Focus on lightly touching the mane without pushing against the neck, and this will begin to develop an independent hand – the most important element of exercises in two-point landing.
To test and improve your position again, try trotting up and down the slopes in a half-stance, being careful not to let your hips get ahead of your heels. Try not to use a lot of muscle effort to keep your body in place. The better balanced you are, the less muscle strength you need.
In the meantime, explore information resources that can help you paint a picture in your mind of what a proper two-point landing should look like. All riders struggle to get their body parts in the right places, and visualization really helps a lot. Study the illustrations in books and articles by top coaches such as George Morris (his book Hunter Seat Equitation is considered the bible for all riders who tackle obstacles), or watch instructional videos such as Jeff Teall’s DVD series. Try to emulate the good riders you see in training, seminars or competitions.
Through a combination of education and practice, you will develop a proper, secure two-point landing. Remember: form is always functional. You are doing everything right if you are in balance!
Robin Petersen, competition coach (source); translation by Valeria Smirnova.


You May Also Like

horse logic
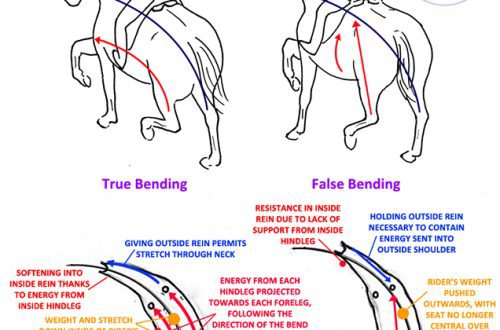
What to do if the horse shows resistance during training?