Preparing for forging: teaching the horse to give legs
For some horse owners, shoeing or trimming is a calm and measured process. For others, this is a difficult test, exhausting themselves, the farrier and the horse. If you’re having any difficulty getting hold of a horse’s leg – whether it’s yanking, kicking, or just uncooperative – the steps I’ll outline below will help overcome these problems, teach the horse to stand still and relaxed to perceive the manipulation of the legs.
The biggest mistake that people usually make when trying to take a horse’s leg (whether it’s a young, not yet accustomed to this horse, or already an adult, but with problems), is that the accustoming process is not broken down into steps that the horse understands. They try to fight and tear off the leg from the ground, having previously limited the freedom of the horse.
Remember, the horse’s natural response to any pressure is to push back and go through it until he learns to give in to it. We must understand that a horse is a prey animal, while a person behaves like a predator. Every time a horse feels trapped or immobilized, it tries to run away. If this fails, the next step is to fight and protect your life. It is according to this scheme that events develop when a person takes a horse’s leg, and she tries to get away from him. Then the person decides to limit the movements of the horse and ties it, begins to fight with the leg, trying to tear it off the ground or keep it in the air, while the horse has a natural defensive reaction – to beat it off.
All you have to do is break this process down into small steps that won’t conflict with the horse’s instincts, and finish each step before moving on to the next. Whether you are teaching a horse from scratch or working on a solution to an existing problem, the principle is the same. First, break the process down into small steps. Once you learn all these steps one by one, you can put them together and succeed.
1. First you need to accustom the horse to touching his legs and hands, and the lead.
I believe that if a horse is afraid or nervous when you try to take his leg, it is most often caused by the fact that he does not want anything to touch his legs at all. If you can’t get your hand down her leg or wrap a lead around her in a way that keeps the horse relaxed, why do you think you can even lift her leg and start nailing on the horseshoe?
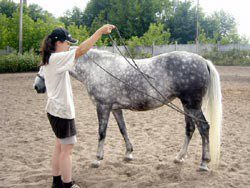
To start touch training on the feet, I use a 5 meter lead lead.
Stand about a meter away from the horse, at a 45-degree angle, and throw the rope over her leg. Take the “tail” of the lead with your other hand and begin to move the rope back and forth, down and up the horse’s leg. All that is required is to show the horse that anything can move around its legs without causing harm. At this point, if the horse starts to move around you, try to stay still and keep the horse’s nose pointed at you, but do not interfere with his movement. As long as he is moving, keep running the rope over the leg, letting the horse know that he can walk around as much as he wants, but you will not remove the rope. As long as the horse is looking at you, he will not be able to go anywhere – even if he starts backing or sideways, just follow him. As long as the horse’s nose is pointing towards you, you can always walk or run faster than it. As soon as the horse is calm and relaxed, immediately release the pressure and drop the rope, pet the horse, and after a while start again. Repeat this until the horse is standing still, ignoring the rope that you throw and move over his legs. You need to start with the rope because you do not have to lean towards the horse’s legs and thus you are safe if he suddenly starts kicking or thrashing around. Don’t move on to the next step until you’ve completed this one.

To make things easier, you first need to train your horse to be comfortable with the rope being thrown at its feet.
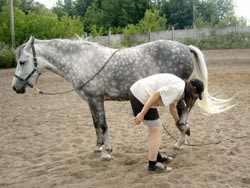
2. The next step is to train the horse to touch your hands on his legs.– the horse will stand still while you move your hand up and down its leg. Start at the top, stroke the horse around the elbow, gradually lowering your hand lower and lower. If the horse starts to get agitated when you lower your hand, go back to the place where he takes the touch calmly, and then start from there. Here you use the “approach and exit” method: starting from the top of the leg, lower your hand down and as soon as the horse starts to worry, remove your hand up again, and then start lowering your hand down again. Soon the horse will understand that touching the legs is not dangerous, there is no need to panic or try to run away. First you need to prove to the horse that your actions will not harm him.
It must be said that these first two steps may take very little time with some horses, but with others (especially young ones) it may take one or two full sessions. Take your time. Stock up on time and patience, and as a result, you will save time.
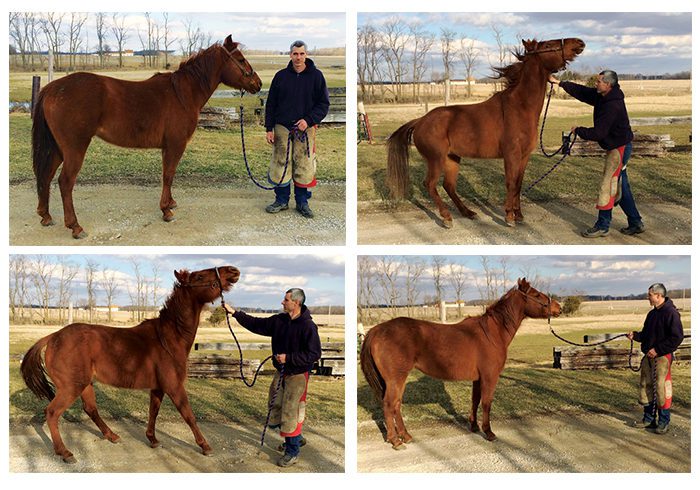
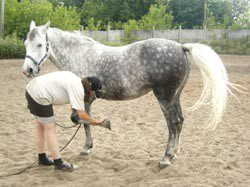
3. Now you need to teach the horse the command to raise the leg. In order to ask the horse to raise his leg, I find a chestnut – a small rough growth at the wrist and inside the hock – and lightly squeeze it between my thumb and forefinger. This creates some discomfort and encourages the horse to take weight off that leg and lift it off the ground for even a fraction of a second. Once the horse has done this, I immediately take the pressure off and just pat the leg. All it takes is for the horse to lift its leg off the ground for a second, after which I immediately return to stroking the leg. No need to try to lift the horse’s leg. You are simply teaching the horse to lift its leg on command. If at any point the horse gets nervous or doesn’t respond well, go back to the previous step(s) and work on getting used to the touch.
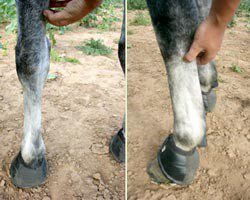
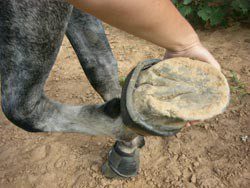
In the photo on the left, Clinton Anderson’s leg raise command is a chestnut squeeze. In the photo on the right – another team (pressing from behind under the wrist and grasping the hock with the palm).
4. When the horse understands the command to raise the leg, you can proceed to the next step:slide your hand down the leg to the pastern and hold the horse’s leg off the ground for a second or two. Once you’ve done that, let go of your leg, scratch it, and after a few seconds, squeeze the chestnut again. All we have to do is ask the horse to hold the leg up a little longer each time. In the first five or six times, it is enough to ask to hold your leg for a second. Gradually begin to increase the time – three, four seconds and beyond. You’re just giving the horse a chance to learn that if he lifts his leg, you won’t force him to keep his leg in the air for too long. Remember (especially when working with young horses!) that the horse must learn to balance on three legs. She cannot go from standing on four legs to free standing on three in ten minutes. Give her a chance to understand what you want from her.
5. You have taught the horse to lift its leg on command and hold it in the air for 10-15 seconds while you support it from below under the coronet or puto. With your other hand, begin to drive up and down the leg from the hindquarters to the wrist, accustoming the horse to touching the legs and in that position. If at any point the horse decides to move his leg, don’t stop him. Move your hand back and forth with it. If you are holding the front leg and the horse decides to move it, keep it in the air, but don’t lock it in place, just wait for the horse to stop. If you try to fix the leg, it can provoke a panic. As soon as the horse stops moving his leg even for a second, let go of the leg, let him put it on the ground, and after a while ask him to pick it up again. Show the horse that as soon as he stops dangling his leg, you will release the pressure and release his leg to the ground. If at this stage the horse begins to jerk his leg very hard and you just can’t keep him in the air, don’t despair. Just go back a step or more and repeat all these preparatory steps again. Don’t try to overpower the horse. Build the whole process as a game.
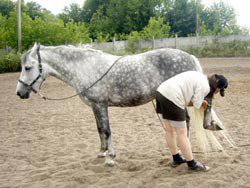
6. So now you can pick up the horse’s leg and hold it off the ground, stroke it with both hands, and the horse won’t go anywhere.Now you can start accustoming to tapping on the hoof – as it will be with forging. I usually start patting the sole of the hoof with my hand until the horse relaxes. If the horse starts to freak out and resist , keep tapping , but lighter and do not interfere with the movement of the leg back and forth . As soon as the horse calms down and relaxes, pat the sole for a couple more seconds and release the foot to the ground. Show your horse that the fastest way to get rid of the tapping is to learn to ignore it. When you’re successful with tapping the hoof with your hand, take a farrier’s hammer, stick, pebble, or something else that has weight and start tapping gently on the sole. Over time, the horse will begin to take it easy, then increase the tapping. In the end, you need to imitate full-fledged blows with a hammer and accustom the horse to the sensations that he will encounter in real shoeing. I find that most horses that don’t like shoeing resist nailing in the first place because of that sensation of shock and vibration in the hoof. Show the horse that this is not something to be feared. This is a very useful exercise for weaners and yearlings, so you will get them to the first shoe with the right mindset. It will pass quietly for both the horse and the farrier. Rest assured, the farrier will appreciate your work!
7. When you have successfully completed this lesson with both front legs, repeat it as often as possible. Remember, the key here is the same approach-departure method. If you suspect that the horse will start jerking its leg after five seconds, release it at the fourth second. Work with the front legs until the horse starts to give them perfectly, and only then move on to the hind legs. The front legs usually give up much faster than the hind legs.
8. The next step is working with the hind legs. When you start practicing – repeat the same steps, starting with rope training. If the horse at some point begins to resist and kick back seriously, drop the rope to the ground and then start over. All you need is for the horse’s nose to look at you. This will force the back of the horse to move away from you. As long as you stand at the horse’s shoulder, he will not be able to reach you with his hind legs. Then follow the same path as with the front legs.
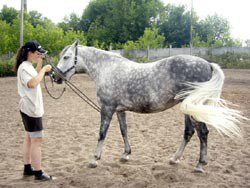
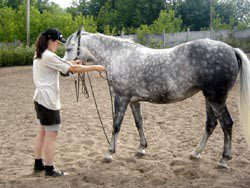
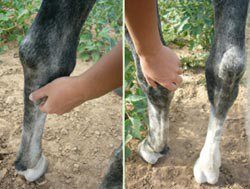
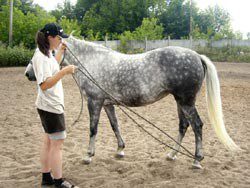
 Learning to touch the hind legs of the rope and hands.
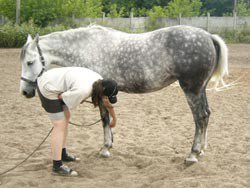
 The command to raise the leg and accustom it to hold the leg in the air.
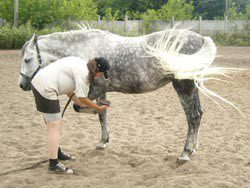
 Learning to touch while the foot is in the air and to tapping.
Helpful advice:when you get to the stage where you ask the horse to hold the leg in the air while you scratch it with both hands, raise the leg like this: with the palm of your hand on the wall of the hoof, bend the leg back, pointing the toe up. If you keep your foot in this way, you will not provoke the effect of claustrophobia. In no case do not try to take a stronger grip on the headstock and lead the leg up.
HUMAN ERRORS
1. Do not start this exercise when the horse is in high spirits. If you haven’t worked a horse for a few days and then taken out of the stall, her attention will be anywhere but with you. Move on to this exercise at the end of the ride or lunge, when you feel that the horse has done a good job emotionally, physically and mentally, is standing still and his attention is directed to you. This exercise will go a lot easier if the horse already treats you with respect.
2. Don’t try to lift and hold your leg too early. Remember, often people try to just get their foot off the ground and fix it. This is the complete opposite of what a horse can endure, as long as it is not given to understand that it will not be harmed. On the contrary, you need to convince the horse that you are not going to force your foot off the ground. The more time you spend on accustoming to stroking the legs, raising the leg on command, increasing the time “above the ground” by a second, the “smaller” the steps, the easier the horse will relate to all this, and especially to the fact that his leg is not stands on the ground.
3. Sometimes people neglect touch training and don’t spend enough time on it. Remember, until you can move your arms, scratch the leg up and down from the coronet to the elbow, and the horse will stand with an absolutely bored look and is not going to leave or start to struggle – do not even try to raise the leg!
4. If the horse tries to “take away” the leg or starts to fight with you, in no case do not fix the leg!Accompany the movement of the leg without removing your hand. If the horse starts jerking his leg too much and you can no longer move with him, just let go of the leg and return to the beginning of the exercise. If the horse starts moving or kicking when you run the rope over it, move the rope up the leg and remember to keep the horse’s nose pointed at you. Remember, when you run the rope back and forth over the horse’s leg, do not do it too hard, so as not to cause discomfort or even a “rope burn”. As soon as the horse realizes that the rope is nothing to worry about, he will stop fighting it off. Do not try to scold the horse at the same time – this will only cause additional resistance at this stage.
5. Don’t try to start these lessons in a limited place – in a stall or at interchanges. The horse must have freedom of movement.It is ideal to start classes in a barrel or on a parade ground. Remember, if the horse wants to move, let him do it – and as long as his nose is pointed towards you, he will not be able to run away. Even if the horse backs away or sideways, just move with it.
DIFFICULTIES
1. The horse walks around and is not going to stop while the rope is wrapped around his leg or when you stroke the leg with your hand – he starts to panic. Be patient and consistent – stay in the basic position and keep going until the horse starts to relax. Remember to start at the top and work your way down gradually. If you’re petting a horse’s leg, getting down on the wrist or hock and he gets nervous, just move your hand higher, to a place that doesn’t cause resistance when touched. Start from there again and move down. As soon as the horse relaxes, remove your hand or drop the rope, pet the horse, and then start training again.
2. If you are tapping on the sole of the hoof with your hand or hammer, and the horse starts to panic, move his leg and try to “take” it away from you, try to reduce the impact and start tapping much easier, starting with minimal strength, and when you see that the horse is relaxed, gradually increase it. Remember, if you’ve tapped the hoof three times and the horse is standing still, release the foot to the ground, and then start again. Next time, try knocking four times before letting go. If the horse starts to pull out his leg, in no case try to hold it and fix it. Just follow the movement of the horse’s leg with your hand and, if you can, keep tapping on the sole of the hoof. This will let the horse know that the sensation of tapping won’t go away just because he starts to move his leg. Don’t try to tap the sole with your hand or mallet until the horse is perfectly able to reach out and keep it in the air while remaining calm and relaxed! If you do this, then don’t expect the horse to stand still when tapped.
3. If the horse starts to fight off the rope or try to run away when you run the rope over his leg – just try to loosen the tension and do not pull so sharply. Also try raising your arms and moving the rope higher up your leg – this will reduce the horse’s defensive reaction. As soon as the horse realizes that the rope will not hurt him in any way, he will stop fighting him off. The worst thing you can do in such a situation is to try to punish the horse or start to move the rope more sharply, or try to stop the kick. Just follow all the movements of the horse. Act like the horse doesn’t do it, and soon he will really stop doing it.
Clinton Anderson.
Material posted with the permission of the copyright holder RideWest.ru
Translator’s comment.
I am often asked how to teach a horse something or how to calm it down if it is afraid of something. At the same time, in a conversation or during work, it emerges that the horse does not ideally give / hold its legs. And sometimes the very question of taking the legs is the main one. Usually I immediately give a link to an article by Clint Anderson “Preparing for forging: teaching the horse to give legs”.
And further than me, in principle, you can not read further, since everything is perfectly stated in the article – and there is nothing to add. But I will make a few comments anyway.because not everyone notices in the article that magic word, which, in general, is the main one in it. .
How often do you hear, or even find yourself in such situations:
- · raskryuchkovyval yesterday to his hooves, back hurts already horror!
- our forger came yesterday – he shod the front, almost tore his back, but left the rear for later …
- · yesterday I tried to scrape the hooves with a rasp, I was very tired of holding my leg – I just take the leg, the horse starts to fall over, I have to hold it!
Familiar, is not it?
And here’s what I know. I just did some cleaning. And not only the back does not hurt, but the hands are quite alive! And it’s not because I’m the greatest weightlifter in the world. It’s just that my horses hold their legs perfectly and do not fall down with all their weight on their hands.
Is it great?
Often you can meet a horse that simply does not know what else is possible. Because they didn’t tell her.
And even more often you can meet a person who simply does not imagine that it is possible otherwise! Yes! That’s right – just can’t imagine! And most private owners do not even think about whether it can be fixed.
The problems are different, but the solution is the same. Listen to the horse, stop and analyze the situation, whether everything suits you, if not, how can you solve this problem. Think about how you can make it easier for the horse to complete the action you want.
Here is a quote from a diary I found on prokoni.ru (I do not aim to somehow offend the author and I quote him only because the situation described by him is typical).
Quote: Gave legs. With a delay of a couple of seconds, he gave his left leg: 4,5 seconds, starts trying to tear his leg out, I hold it, I don’t give it, another 2 seconds, he pulls out again, I don’t give it back, he frees the diagonal hind leg! – almost lies on me, for a second it becomes the remaining 3, and I immediately let go. I give sugar, move on to the other leg, sigh! I ask for a leg, he immediately reacts to the command, 3-4 seconds pass, he starts to pull out his leg, after the 6th second, he just starts to fall on his knee, I had to let him go at the very ground!
What do we see? The horse hinted at the correct action a couple of times, but the hint went unnoticed. The most important thing was also missed: as a result, in one lift, the “successful” time decreased from 4 seconds to 1.
So, I promised to say a magic word that will 100% change our attitude to trimming and any manipulation of the horse’s legs.
EQUILIBRIUM
That’s it! And only it.
Try experimenting with a friend of yours (warn him that he doesn’t really want to lift his leg as a matter of fact).
Let it stand straight, with weight distributed on both feet. We take the trousers and pull. Then stronger. Since the balance is “at risk”, he will lean on this leg a little more. When the leg nevertheless manages to be torn off the ground, he instinctively leans on the raised leg – if not with all his weight, but with a noticeable part of it. And when you want to put your foot back – try to hold it. Difficult? And the horse weighs at least 7 times more than your friend!
Now we act differently. Lightly “pinch” a friend under the knee. Not very strong to begin with – just denote. Sometimes this is enough. Sometimes you have to “pinch” harder. And even if a person is not determined to raise his leg, he will tear it off the ground in response to this impact. Let it be for a few seconds, but the situation turns out to be exactly the opposite of the previous one – the weight of the body is instinctively transferred to the second leg! Accordingly, “taken” is facilitated! And each time the command to lift the leg will be needed weaker. And it will be easier for a person to stand on one leg and then, when taking the leg, it will be “light” for you.
But at first, your friend won’t be able to stay that way for very long. If you try to hold him longer, he will lose his balance a little (because he is not yet used to standing in this position for a long time), and in an attempt to compensate for this, he will transfer some of the weight into your hands! If now you continue to hold your leg and try to push a comrade leaning on you with your shoulder, there will be no progress.
Everything goes in a vicious circle: balance is lost, hold tight, attempts to balance, pokes in the side, support, balance is lost even more … and so on.
The same thing happens with horses. The only difference is that a horse is somewhat easier to balance on three legs than a person on two.
The main point here is to teach the horse to distribute the weight on three legs and train for this her muscles. Yes, it is to train, because every time you start to teach a horse to give legs, it includes muscles in the work. Let it not be as noticeable as, for example, when jumping, but nevertheless. At the same time, it does not matter who to teach – a foal or an adult experienced horse. Many older horses have become accustomed throughout their lives to having their legs taken from them, rather than being asked to give. But this can be corrected by teaching the horse to balance on three legs.
The author of the above quote had a horse calmly holding its leg for 4 seconds. Excellent! I would let him go at the third second. Next time he would hold his leg longer.
Again, why do I recommend everyone not to pull up on the brush or puto? This gives the horse no incentive to distribute weight on three legs. In this case, an untrained horse most often leans slightly on the leg at first. Yes, and some trained – too.
When a horse feels a “pinch” under the wrist (or on the chestnut), he will instinctively bend his leg at the joint, which means lifting it off the floor a little. Without first balancing on three legs, the horse will not be able to do this.
And one moment. Very often when a horse is trained to give legs, successful attempts are rewarded. delicacy. I did that myself in the beginning. But it also complicates the process of accustoming to the correct raising of the leg somewhat. I’ll explain why.
When a horse knows that he will get a treat, he will wait for it … and accordingly rush to get it and unconsciously unbalance on three legs. Some horses turn towards the person in anticipation of a reward, while others simply lean slightly.
One more thing. If a horse is given a treat after it puts its foot on, the person is on the side of the taken foot, which means the horse will lean quite a bit, but still towards the sugar. And it will also slightly upset the balance.
To teach a horse to give a leg, you need to make it easier for him to learn. And a treat can be given after the “learning session”.
Everything said is my personal opinion. But there is nothing more pleasant than trimming a horse when he holds his own leg. And all because she was taught to give a leg, and did not take it.
I don’t know if I’ve written something useful…because everything useful was written by Clint Anderson before me.
Natalia Gerasimova (Olmek)
The material is posted with the permission of the copyright holder RideWest.ru


You May Also Like
6 exercises that will diversify riding without stirrups
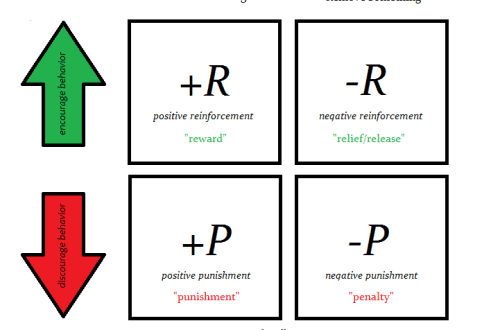
Negative Reinforcement in Horse Training: Pros and Cons