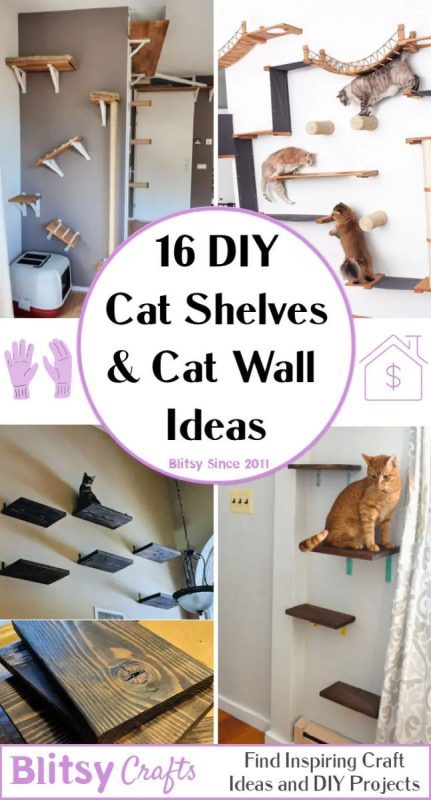
How to make do-it-yourself cat shelves
If a cat lives in the house, it can be considered its rightful owner. So why not build her a high perch from which she will survey her possessions? DIY wall shelves for cats are a great way to make something special for your furry pet. And the ideas of a play complex for cats on the wall are a great opportunity to create a dream space for a pet.
Contents
Why do cats like to sit on top
When a pet jumps on the dining table, she does not do it because she wants to fool around or annoy the owner. Although cats are famous for their love of comfort, they still have strong hunting and survival instincts. They inherited from wild ancestors who roamed the jungles and savannahs in search of food and shelter – what their large feline relatives do to this day.
Being both a predator and prey, the cat feels safe on the hills, imitating trees. But there are certainly places in the house or apartment where the presence of a cat is not at all desirable, for example, on the kitchen worktop. In this case, it is better to switch the cat’s attention to other places by making a comfortable perch for cats with your own hands and placing it in front of a window or door to the yard. So that the pet can view the room from a “bird’s eye view”, do-it-yourself wall shelves for cats are best suited
Wall shelves for cats and their impact on pet health
Wall-mounted play sets for cats enrich the environment of the pet, relieving him of boredom, which usually entails trouble. They also allow animals to maintain excellent physical and mental health.

Domestic cats benefit from “regular physical, emotional and intellectual stimulation, which helps them stay in top shape and in a good mood. In addition to special trees and cardboard boxes, you can offer your cat play walls for cats, which will provide her with a safe personal space. The time required to create such a do-it-yourself environment for a cat will be approximately 30 minutes per shelf. But you also need to allocate extra time for design and security testing.
How to make a shelf for a cat: materials
The most important aspects of the design of high complexes are their safety and strength. To securely fasten a high shelf for a cat, you will need boards and brackets that will support the weight of the animal and will not interfere with its movements. For this you will need:
- Wooden board at least 1 cm thick, 30 cm wide and 40–45 cm long.
- Sturdy corner brackets. The length of their larger edge must be at least half the width of the board used.
- Heavy duty wall anchors, best screwed directly into wall studs.
- Screws of a suitable length for fastening the board to the brackets.
- Meter or tape measure.
- Level.
- Screwdriver.
- Drill.
- Fabric for finishing boards (optional).
- Aerosol glue (for fabric, also optional).
Choice of boards, brackets and fabric
Making DIY cat wall shelves is a great way to reuse or recycle unwanted boards. If they are not in the house, you can ask friends or neighbors. It is necessary to choose only those boards that correspond to the length and weight of the animal.
“Shelves should be large enough for the cat to fit on them without her limbs hanging anywhere,” emphasizes Pam Johnson-Bennett, author and cat behaviorist, in an article for Cat Behavior Associates. According to her, if the pet is cramped on the shelf, she will feel vulnerable and anxious, especially if she lives in a house with other animals.
Despite its flexibility, the cat can fall, so it is necessary to leave enough room for her to move. The animal must be able to turn around on the shelf and crouch to push off for the jump.
It’s best to check with your local hardware store to see which boards and brackets are strong enough to support your cat’s weight. Sometimes specialists can cut boards to the desired size and shape at no extra charge. You can also round the corners of the boards or purchase foam corner protectors so that the cat does not get hurt when it jumps on and off the shelf.

To ensure safety, the length of the boards must be at least 30 cm: this will guarantee a stable landing. If desired, you can make them longer, for example, the entire length of the wall, if the boards are strong.
For long boards, two brackets at each end will not be enough. They will require more supports, which should be placed at appropriate intervals. As a general rule of thumb, support brackets under the board should be placed every 40 cm – usually at the same interval in residential structures, wall frame posts are placed, depending on the year and place of construction.
You can show your imagination and paint the brackets in any color that goes well with the interior. Using leftover paint from other projects is another good way to reuse or reduce materials. And because wood surfaces can be slippery, International Cat Care recommends covering the boards with a non-smooth fabric or material for added safety.
You can use durable or shaggy non-slip textiles, such as chair or sofa covers, an unnecessary blanket, rug, or even the upholstery of an old suitcase. Be sure to sand all used boards so that the cat does not get a splinter
How to make shelves for cats on the wall with your own hands
First you need to choose a place for the shelves. There should be enough empty space around this place so that the pet can safely jump on and off the perch. The floor surface must be level, and it is also important to check that there are no objects with sharp edges, such as tables or fragile items, nearby.
Once you’ve chosen a location, you can use the following step-by-step guide to make a cat shelf.:
- Stick the fabric to the board using spray adhesive according to the instructions for use. If the fabric is thin, such as cotton, you must first sand the edges of the board so that the surface is soft and smooth.
- Paint the corner brackets and let them dry.
- Space the boards so that the cats can safely move from one to the other. If a small kitten or an elderly cat lives in the house, the shelves should be placed lower and closer to each other.
- Mark on the wall the places where the holes are planned and make sure they are at the same height for each bracket – you need to use a level to check.
- Drill pilot holes in the wall studs or make holes for wall anchors and push them in. Attach the corner brackets to the wall with self-tapping screws.
- Install the boards on the brackets and fix them with screws.
Once the shelves are secure, give your cat time to sniff and inspect their new play area. A little bit of catnip on the shelves will help the pet understand that it is possible to climb there. But, most likely, a curious pet was watching the construction process, so you don’t have to push it.
Creative ideas for a complex for cats on the wall
Making your own pet shelves will give you creative control over the whole process. You can hang not only one shelf, but also build a house for a cat on the wall. If the boards are strong and safe, you can hang shelves of different sizes on the wall to create an interesting design that will not only interest the cat, but also please the eye.

If there is room in the house, you can create a whole corner for your pets by installing shelves for cats, and then painting the wall around it or sticking removable stickers on it. You can also look in the children’s section of malls and online stores to find stickers, wall borders, and other decorative items. You can go even further in creating a cat kingdom and build a real palace for your furry friend.
Thanks to these fun shelves, your pet will no longer have to sit on the refrigerator or kitchen cabinet. What a pleasure a cat will have while spending time in his kingdom! And the owner will have fun watching her
See also:
Do-it-yourself toys for cats Do-it-yourself closed toilet for a cat: how to hide the tray Original do-it-yourself cat beds Do-it-yourself cat scratching post


You May Also Like
Large cat breeds
Why do cats like to stomp on humans?