Do-it-yourself chinchilla showcase – step by step instructions with drawings and photos
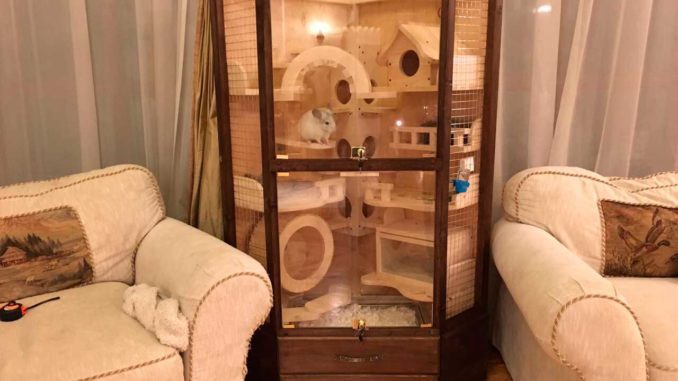
Due to their rather large body size and high mobility, chinchillas need a lot of space in order to stay healthy and active. Showcases with glass doors look more aesthetically pleasing than massive metal cages, but the purchase of such a device will inevitably hit the budget. The way out of the situation may be the decision to make a showcase for a chinchilla with your own hands at home.
Contents
Advantages of a showcase for chinchillas
Veterinarians recommend keeping mobile animals in high structures with an abundance of shelves and stairs, and special attention should also be paid to nibbling items. The cage-showcase made of wood meets all these conditions, and is also distinguished by convenient operation. Choosing such a house for a fluffy pet provides a number of advantages:
- saving space in the room – a moderately wide rack, located against the wall, gives a large area for chinchilla games, but takes up much less space than a regular cage;
- aesthetic appearance – the device can be made of wood that matches the texture of the room;
- convenient observation of the animal – glass doors provide an excellent overview and make it possible to freely monitor the games and behavior of the pet;
- low noise level – in the window, chinchillas do not have the opportunity to gnaw and shake metal rods, and the doors muffle the sounds that accompany the activities of the animals at night;
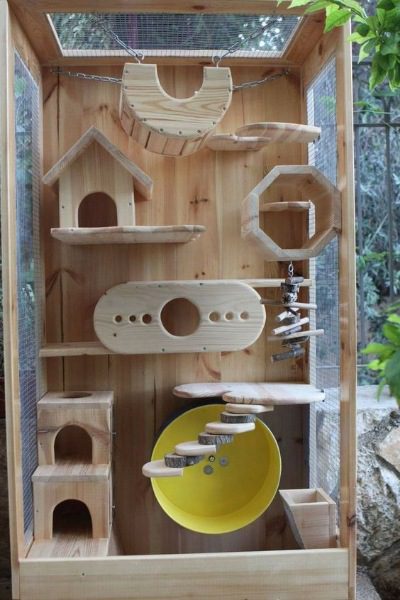
- in such a structure, the rodent will feel free – it is easy to place many shelves, various toys, wheels, feeders, houses there. The pet will get enough space for jumping and climbing – all this will significantly improve the quality of his life.

The showcase has enough space to accommodate a variety of toys.
IMPORTANT: If the rack is located at a height, it can be left open without installing a glass facade. But the doors will still provide additional security for the pet, as well as eliminate the scattering of filler and other debris.
Materials and Tools
When choosing a tree – a natural material that is safe for the health of animals and their owners, the problem of grinding teeth is also solved. Making a shelving unit from solid wood will provide the most durable and long lasting result. But such material is quite expensive in itself, and also requires processing in several stages – grinding, impregnation with special protective compounds, varnishing. Chipboard will be a cheaper analogue – this material does not need special processing, it is easy to care for, products made from it look good in the interior of an apartment.
To protect chipboard from the teeth of animals, removable shelves are made of wood – these boards will be easy to replace when they become unusable.
Also, due to the ability of wood to absorb odors and moisture, showcases are sometimes preferred to be made of aluminum and plastic. For the facade of the rack, it is better to take tempered glass 6 mm thick, and a galvanized metal mesh is used for ventilation.
To paste over the saw cuts, a thin PVC tape of a suitable width is suitable. The bottom of the showcase is covered with a tray for easy cleaning. From the tools you will need to assemble the following set of items:
- hacksaw;
- stationery knife;
- drill and drills;
- scissors for metal;
- self-tapping screws, coupler screws;
- electric jig saw;
- level, tape measure.
Tools can be purchased at any hardware store. It is better to buy glass doors with hinges and a lock already installed, otherwise you will need to find tools for working with glass. To make a metal showcase, you will also need special drills, tongs and a grinder.
Step by step instructions for making
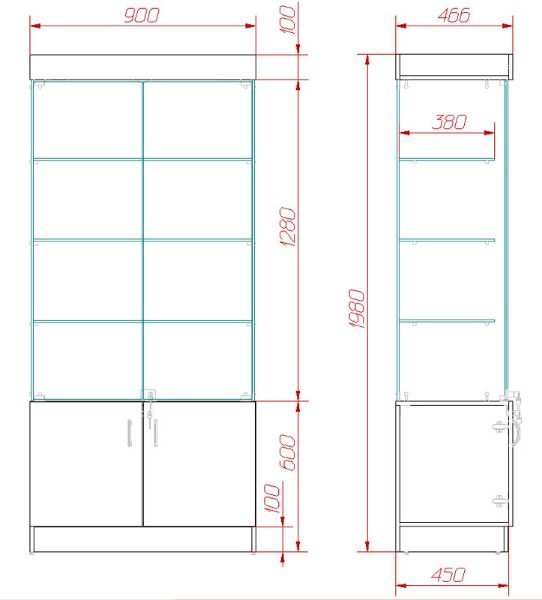
To make a showcase for a chinchilla yourself, you must first draw up a drawing. An interesting suitable option can be found on the Internet – when using, substitute your measurements to check whether you can make the model you like. In the absence of sufficient experience in construction work, it is better to take a simpler drawing, as in this photo:
After all measurements are taken and transferred to the diagram, all drawings are made on paper in a reduced scale. At this stage, it is important to carefully check that all dimensions are correct.
Then, using a ruler, marker or chalk, the details of the drawing are transferred to pieces of wood or chipboard already in full size. Next, the following steps are carried out:
- From the prepared materials with a hacksaw or electric jigsaw, the details of the rack are cut out exactly in accordance with the diagram. For metal, a grinder and appropriate cutting wheels are used. If home conditions do not allow you to work with details, or there are no suitable tools, you can contact the workshop. Such a service will not be free, but still will not require large expenses.
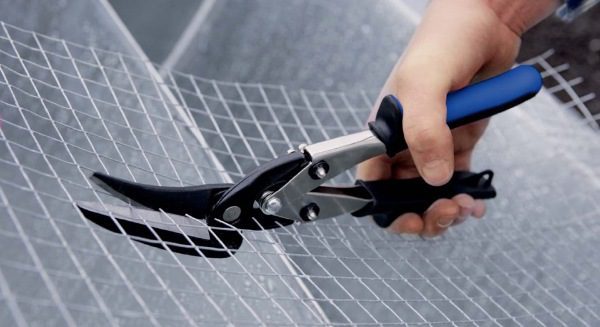
- Windows for ventilation are cut out in the side walls, which are tightened with a mesh. Pieces of mesh are cut with metal scissors, and then attached with wide-head screws. To mask and protect the attachment points, you can use the thresholds of the metal profile.

Ventilation windows covered with mesh - Ventilation holes are also often made in the ceiling – you can pick it up with a mesh as a whole. It will be convenient to cling to the fastenings of hanging toys and hammocks for metal mesh cells.
- Holes are drilled in the marked places for the tie screws. Their task will be to fasten the parts together.
- First, the back and side walls are fastened to the pallet, then the ceiling is installed according to the same principle.
- Install shelf mounts and shelves themselves.
- Screw the door hinges holding the glass facade.
- In places where chipboard cuts are visible, PVC tape is glued.
- To protect pets from drafts, the showcase must be raised to a height of 30-50cm. For this purpose, you can cut wooden legs, but it is better to make a bedside table. Then this space under the rack can be used to store food, sand, bathing suits, toys and other accessories for keeping animals.
- In order to assemble the nightstand, screws and self-tapping screws are used, the hinged door is attached to furniture hinges, and special magnetic fittings can be used as a lock.
Homemade cage from old furniture
A lightweight option for making a display case at home can be the conversion of an unnecessary bookcase or kitchen cabinet. This will allow you to get by with a minimum set of materials and tools. Glass doors are usually already present in such a piece of furniture, so it remains only to cut through the windows for ventilation and take them with a mesh, as well as make a division into floors. If the cabinet doors are solid, they are removed and replaced with glass ones, later shelves can be cut out of wooden facades.
If the option with a showcase does not suit you, you can make a cage with your own hands. To do this, we recommend reading the article “Do-it-yourself chinchilla cage”.
Video: do-it-yourself showcase for chinchillas
How to make a showcase for a chinchilla with your own hands at home
4.5 (90.83%) 24 votes


