School of a young horse, part 2.
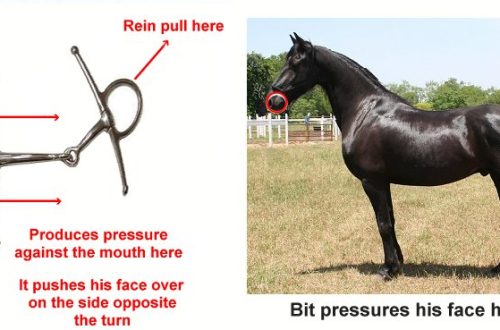
The work of the occasion is of a certain nature. For example, when driving to the right in a circle, the right rein is pulled with its withdrawal to the side, and this tension should be of a variable nature. The guiding action is carried out until the horse goes in the desired direction and turns the neck (without resistance) to the right. When the resistance of the neck muscles ceases, the reins should be immediately released. If suddenly the horse intends to deviate from the movement in a circle, the rider again tightens the guiding rein and leaves it in this position until the horse walks as required. The horse will soon realize that obedience and compliance with the reins are rewarded by getting rid of the “action” of the bit that is unpleasant for him. The basis of training a horse is to immediately reward him for obedience. The reward for the horse is the complete cessation of the reins. If the reward is late, then the horse does not associate the rider’s yielding with the cessation of the reins. Thus, these light, guiding actions are applied with such frequency and intensity as to make the horse move in the intended circle. The outside rein must be loosened, it is used in case of danger of the horse going into a canter.
When the horse is walking calmly, the rider may begin to tighten both reins slightly to have very little effect on the horse’s mouth. In this way, he will train the horse to gradually “take” the bit (rein) by keeping the head and neck in a naturally extended position. It should be remembered that if the horse raises his head too high, then the rider’s hands should also be raised higher, while “revitalizing” the horse’s mouth by moving the bit slowly, very lightly while lightly pulling on the reins. As soon as the horse yields and lowers his head, he is immediately rewarded with loosening the tension on the reins, which allows him to lower his head to a normal position.
The rider should be aware that when the reins are pulled, the horse reacts by pulling his head in the opposite direction. And the task of the rider is to strive not to extinguish this natural property of the horse.
Never use reins and legs vigorously at the same time. This adversely affects the freedom of movement and reduces the capture of space at every step of any gait.
Then the horse is lifted into a free (working) canter and again ride in a circle, first in one direction, then in the other. When cantering in a circle, the rider must pick up the inside rein and press the outside leg. Only a slight tension on the rein should be done. The outer leg is used more vigorously than the inner leg. Legs, as well as hands, should be used alternately: weakening the pressure when the horse obeys and immediately increasing it when resisting or disobeying.
As a result of the systematic, persistent application of the described exercises, after two or three months of work, the horse becomes calmer, gets used to the rider’s demand to keep his head extended, and responds correctly to the action of the reins and legs. At the same time, relaxation of the back muscles and a calm holding of the snaffle in the mouth (taking the rein) are observed.
After the horse becomes calm when moving in a circle, proceed to the next stage – learning to change the gaits (acceleration, deceleration and stops).
From this stage, the horse is taught to use the rider’s body as a means of control, preceded by the action of the legs and reins. The help of the rider’s body in controlling the horse is not so much in the slopes of the body itself, but in the pressure (encumbrance) that his ischial bones produce on the horse’s back, in different directions: – forward (with increased gait), – back (when stopping, reining back, reducing the gait), – to the sides (when turning, lateral movements).
As with other controls, the rider’s body weight (mass) transfer must be kept to the strictly necessary minimum for it to be effective.
Transitions are the most difficult for a horse, especially a young and easily excitable one. Here are exercises that will allow you to teach the horse to regulate the gait and speed of movement and to maintain balance correctly. These exercises must be repeated and repeated.
All movements of the arms (hands and elbows) while pulling the reins must be performed gently and gradually. The rider’s hands counteract the force of the horse’s head, so that when the horse yields to the rider, the rider does not move his hands towards himself, but, on the contrary, releases the reins, moving his hands forward in order to reward the horse for obedience. When the gait slows down, the reins are re-tensioned somewhat, with a minimal slope of the body back.
When stopped, the reins are immediately released completely as a reward for obedience. The rider does not lean back, but remains slightly leaning forward. After the horse has become obedient and calm when working on a circle and has begun to obey the slightest movement of the rider’s hands, it should be trained to walk on a sufficiently long (released) rein and stop after a few steps. As soon as the horse comes to a halt, the rider’s fingers are immediately released completely, the reins are released and the horse is allowed to rest in place, with a pat on the neck for a few seconds. Then, in obedience to the minimal forward slope of the rider’s body and a slight movement of the legs, the horse should move forward. As the horse learns to stop quickly and stand calmly, the rest periods should be progressively shorter so that these stops last only 1-2 seconds.
Then the horse is taught to transition from a trot to a walk and vice versa. After moving at a calm pace for a few moments, the horse is transferred to a trot. and when she switches to a uniform balanced movement, she is again transferred to a step. The periods of trot and walk should be shortened more and more, and the transitions from gait to gait should be more frequent. After a few lessons, the horse should often be trained to gradually pick up the trot, then bring it to a slow trot, and finally stop it. During this stage, which lasts 3-4 months, you need to constantly work on stops at different speeds. In practice, the horse’s ability to instantly shorten and stop lies in the control of the momentum of his body, which is an indispensable quality of a sports horse.
A horse that obeys the aids in circles, spirals and turns is prepared for shoulder-in movements.
The essence of this exercise lies in the movement of the horse in one and a half tracks with the deviation of the front part of its body from the line of motion by no more than 350 (first time at 15-200). In this case, the rear outer leg follows the trail of the front inner leg, and the body is bent in the direction opposite to the direction of movement. Let’s take the “right inner shoulder” as an example. The horse bends all over the spine (except for the sacrum) and moves to the left side, keeping his body at an acute angle to the direction of movement. This exercise requires the horse to try to bring its front and hind legs as close as possible with each step. Thus, the horse seems to bend around the right leg of the rider so that his right shoulder is inside the curve formed by the bent spine. With each step, the right front leg will have to be transferred (crossed) in front of the left front, and the rear right, respectively, in front of the rear left. In this case, the muscles of the left side of the body are stretched, and the muscles of the right are reduced. sdfsd video jokes fsdfs It should be emphasized that the essential thing in this exercise is not a formal requirement to “put” the horse’s shoulder inward, but to make it step forward through the outside leg in a bent position with the inside hind leg. When moving “shoulder in” the main role is played by the curvature of the horse. The rider looks in the direction the horse is moving. The position of the hands and legs must be impeccable. All aids must be in such interaction as to exclude the possibility for the horse to lean back or rush forward.
The main points to which the rider should pay attention when teaching the horse to move “shoulder in”: a) when shortening the inside rein, they should act in such a way as to achieve curvature of the entire spine (body) of the horse. In this case, the bending of the neck is limited by the action of the outside rein so that this bending corresponds to the general bending of the horse’s body; b) the impulse, that is, the desire of the horse to move forward, should be supported all the time by the legs; c) stop the exercises before the horse, irritated by the monotonous movements that bored him, begins to resist.
The shoulder-in exercise is first carried out at the walk and at a working trot, and later on at a non-vigorous reduced and medium trot. It is most convenient to start the movement “shoulder inward” from the wall from a volt or from the corner of the arena. The horse is already bent in a circle. After mastering this exercise, you can begin to work out lateral movements.
Reprises of movement through cavaletti should not take more than 20 minutes. The cord should be attached only to the capsung. Work on the cavaletti under the rider is practically no different from the work described on the lunge.
Along with the dressage of a young horse, one should not forget about its versatile development, improvement of the cardiovascular, respiratory and muscular systems. For this purpose, the most suitable training is field riding in free gaits – walk, trot and canter. Therefore, at least twice a week, it is necessary to conduct field training with a total volume of up to 1,5-2 hours. The alternation of repetitions in this case may look like this: step – 15-20 minutes, trot – 10, step – 10, trot – 15, step – 10, gallop – 5-7, trot – 5, step – 25-30 minutes. It is desirable to carry out such training on slightly rough terrain, using field roads and paths. During work, especially when walking, you can perform a few simple dressage exercises.


