How to properly care for a clutch of lizards?
Did you find a clutch of your lizard in your terrarium? Or are you just starting out in terrarium and want to breed your wards? The answer to the question “How to properly care for the laying of a lizard?” – different for each individual species, below is the basic knowledge for each of the “types” of masonry.
Contents
Part 1 of 3: Choosing an incubator for your type of eggs.
1. Buy a ready-made incubator. The first thing you should do is to understand what kind of lizard has laid its eggs. Find out the temperature and incubation time.
- Hovabator incubators are inexpensive and suitable for most species. Incubators of this type are used for incubation of eggs of birds. You can buy them in an agricultural store, an online store, or you can make it yourself.
- You can buy a special incubator for reptiles from Exoterra, Juragon or any other.
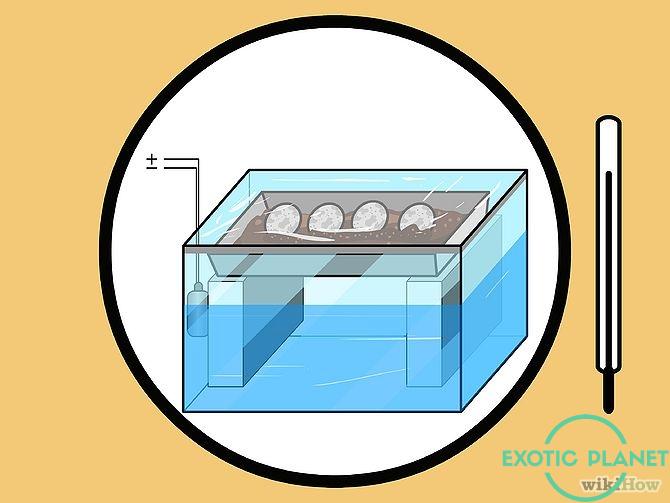
2.Make the incubator yourself. If for some reason you are not able to buy an incubator, you can make it yourself. You will need a 10 liter aquarium, an aquarium heater, 1-2 bricks, plastic containers (for example, a food container), plastic wrap.
- Place the bricks in your tank and fill it with water just below the top brick. On top of the bricks place a plastic container in which to place the eggs, try not to change their position.
- Place the aquarium heater in water and set the temperature required for incubation.
- From above, the aquarium should be tightened with plastic wrap – to maintain temperature and create high humidity.
3.Choose a container. You are already ready to incubate the eggs, but what is the best way to deal with the container? And what should the container be filled with?
- Depending on the size of the eggs, containers of different sizes should be used, there are no strict rules in this case.
- The container should be half filled with substrate. It can be moss, vermiculite, perlite, hatchrite. The soil should not be too wet (watery), just damp. The best way to determine the correct degree of moisture in the fill is to squeeze the soil in your hand as much as possible – if water does not drip from it, then you did everything right. Now the soil can already be put into the container.
3. Put the eggs in the container as carefully as possible. You are ready to take the lizard eggs out of the terrarium and put them in a container, but you have to be very, very careful.
- 24 hours after the eggs are laid, the embryo adheres to one of the walls of the egg and begins to grow. If you turn the egg over, the embryo can easily die.
- It is very important that when moving the egg you keep it in the same position in which it was laid. Before transferring the eggs, make a hole in the substrate, then lower the egg into it.
- Take a pencil in your hand and put a mark on the top of the egg – now, if by chance the egg changes position, you can put it back in place and hope for the best.
- Place the eggs a finger-width apart. Close the container tightly with a lid and place it in the incubator. Write down somewhere the date the eggs were laid and calculate when they will hatch.
Part 2 of 3: Preparing for Lizard Hatching
1.Check the eggs periodically. After a week, you should look at the eggs to make sure they are healthy and growing.
- Buy a small white LED, take out the container, go into a dark room, open the lid and light up the egg as close as possible. Be careful – you can not press on the egg or move it. Inside the egg, pink, red, and possibly a little bloody vessels will be visible. This means that everything is in order with the egg. If the egg is yellow in the light, it means that it is either sterile, or dead, or not enough time has passed to see the growth.
- Close the container and put it back in the incubator for one more week and then check again. If the egg is alive, you must see something after a month. Rotten or dead eggs become greyish-white or yellowish, moldy and out of shape. Live eggs usually remain bright white and swell throughout the growth period.
- it is good if you check the clutch every one to two weeks throughout the incubation process. At each inspection, you will observe the development of the hatchlings, and the eggs will receive a portion of fresh air when you open the container. Do not open the container more often than the specified period – the incubator may lose too much moisture.
2. Prepare nurseries for babies. While you are waiting for hatching, create a container in which you will then transplant the young. For most species of lizards, plastic containers with paper towels at the bottom will do.
- Paper towels are the most suitable option. they are the most sterile and animals will not be able to swallow them.
- If your species is arboreal, mark branches or other objects in the container for the lizards to climb.
- put a small drinker (bottle cap, for example). Or install a special drip drinker if your lizards cannot drink poured water (Chameleons, tropical geckos).
- Make sure the cage has the right humidity and temperature for the fingerlings. Babies usually hatch within 24 hours. And you have to make sure that they all successfully get out of the shell. If you’ve provided the right humidity, chances are the van won’t have to worry about it.
- Some baby lizards require less moisture than adults. So it is worth carefully studying your species. Fingerlings begin to eat a couple of days after hatching, be prepared to provide them with food and the necessary supplements – calcium and multivitamins.
Part 3 of 3: Learning and Types of Eggs
1. What to do if you have a large masonry buried in the ground. Many lizards make one clutch, and it is usually buried in the substrate and not stuck together.
- For example: monitor lizards, bearded dragons, chameleons.
- Some lizards only lay 2 eggs at a time. Usually they are buried and do not stick together.

2.What to do if you have sticky eggs? Typically, such clutches are made by geckos, which attach their clutches to some object, put them in cracks in the walls, etc.
- For example, felsum eggs, current geckos, vitatus and many others.
- Be extremely careful with glued eggs. This type of eggs have a hard shell. Do not try to separate them or remove them from the place they were attached to – the chance of breaking the shell is very high.
- If the eggs are stuck to the glass you can try removing them with a blade. Be very careful to cut slowly so as not to crush them.
- If the eggs are on a branch, it is best to cut it off and place the eggs in the incubator along with the branch. Do not try to detach the eggs from the branch – they can break and die very easily.
3. Some parents can eat their cubs, while others, on the contrary, can protect them. Take precautions if your gecko species is preying on its offspring.
- To protect the clutches left in the terrarium, you can glue a plastic cup over the eggs. Then adults will not be able to get to the kids.
- Some types of geckos guard their masonry (currents, vitatuses). Don’t worry about the eggs – just leave them in the terrarium and provide the right temperature and humidity.
- If you have a clutch of Toki geckos, be careful! They will protect their eggs and babies. They will do everything they can to drive you away.
4. Your eggs may not need an incubator. Almost all clutches need an incubator, but some do not need it at all. For example, most species of chameleons.
- Banana-eating geckos (and other species of the genus Rhacodactylus)
- Any other lizards that live in cold areas can be incubated at room temperature (about 20 degrees).
- If you don’t need an incubator, you can leave your eggs in a dark place in your house – in a cupboard, under a bed, under a table, etc. Check them once a week to make sure they are growing and wait until they hatch. Everything is very simple.
5. Maybe the temperature will affect the gender of your pet. For some species, the temperature range during incubation will be decisive in sex formation.
- At some temperatures, females will hatch, at others, males. There is also a temperature range in which both males and females will hatch. Temperatures are individual for each species. The incubation temperature can also affect the incubation time.
- For example, you decide to incubate eggs at a temperature of 27-30 degrees, with a designated hatching period for your species of 60-90 days. At the maximum temperature of the incubator, the eggs will most likely hatch after 60 days. However, this does not mean that the offspring will be better. Surely the indicated incubation temperature limits are equally well suited for the lizard species, nevertheless, it is worth bearing this in mind.
Source: ExoticPlanetTranslated by: Nikolay ChechulinOriginal: WikiHow


