
Dressage horse training on Cavaletti
Dressage horse training on Cavaletti
How can cavaletti improve the working qualities of a dressage horse and aid in dressage training? The answer is simple: poles and cavaletti help develop rhythm, improve momentum, and make the horse more focused on the exercise. Ingrid Klimke and Cornelia Kindermann will tell you how to organize training using cavaletti.
Ingrid Klimke
Igrid Klimke won her place on the equestrian walk of fame long ago. Many more victories await her ahead. Like her father Rainer Klimke, Ingrid competed in dressage and eventing. In 2002, she became a World Cup finalist in dressage, and as a triathlete, she was a participant in five Olympic Games. With Sleep Late, she became fourth in Sydney in 2000, with FRH Butt’s Abraxxis on Germany’s gold-winning team, fifth in Hong Kong in 2008. London 2012 (team gold) and Rio 2016 (team silver) followed. Ingrid has competed in three World Equestrian Games (in Lexington, Aachen and Normandy). At the European Championships in Malmö, she took silver with her new partner FRH Escada, and at Euro 2015, together with Horseware Hale Bob, Ingrid played for the German national team – the winning team.
Cornelia Kindermann
Cornelia Kindermann celebrated her first success as a member of the winning team at the 2000 European Junior Championships. Holstein gelding Chamberlain by Calypso and Oldenburg mare Despinya brought her more than ten victories at the Grand Prix level. In 2011, this allowed her to receive the Goldene Reitabzeichen award. Her most significant coaches were Rosemarie Springer, Karin Lührs and Jürgen Böckmann. Since September 2015 Cornelia has been working with horses of the Holstein Union. She tested all the exercises described below on two young four-year-old stallions.
Usually, when we talk about dressage, we think of the arena and working on certain elements that we need at one level or another. We think of a rhythmic four-beat walk, a guided trot from the rear, a three-beat straight canter. To achieve all this, we use transitions, figures, bends, lateral movements, we strive to prepare the horse as best as possible for the competition, to show how good our training is and how supple, supple and balanced we have a horse. But the methods listed above are not the only ones; success can also be achieved as a result of working on cavaletti.
Let’s face it, despite the fact that dressage masters like Ingrid Klimke use Cavaletti in their training, most riders underestimate this type of work. There are many dressage stables where you can’t find a single pole. This article, containing a description of a series of cavaletti exercises and the results that can be achieved as a result of their implementation, is aimed at changing the current situation.
1. MORE RHYTHM AND BALANCE
1.1
Equipment:
4 places, 4 cavaletti or 6 places, 4 cavaletti (see diagram)
Placement Tips:
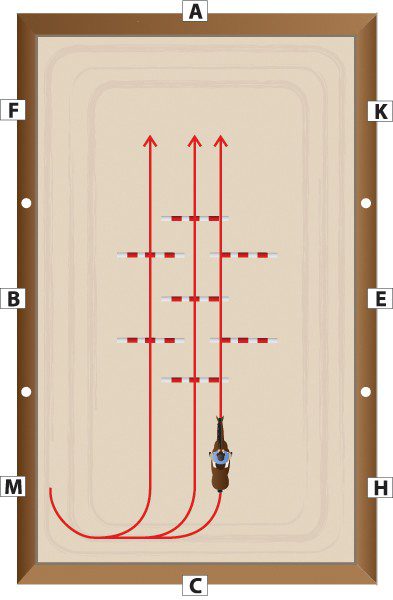
Arrange two poles to form a 1,3m wide corridor parallel to the center line at GI and DL. Place four cavaletti between B and E at a distance of 1,3 meters from each other. Make sure the two inner cavaletti and the two pairs of parallel poles are in line.
Goal:
We work on a serpentine. Each loop touches the long wall of the arena (red line). We pass the poles at the front trot. Shifting from rein to rein creates contact and forces the horse to engage his hindquarters and back, creating momentum. Try to ride the poles in the center, this will require more attention from you and the horse.
Performance:
- After the poles, we make the transition to a walk, then again raise the horse to a trot. These transitions will improve contact and conduction and strengthen the horse’s hindquarters.
- Make transitions along the center line. Trot-walk-trot or transitions within the gait – move-shorten (blue and green lines).
- Reduce the distance between the outer pair of poles to 0,8 m. Ride the serpentine at a walk, then lift your horse into a trot and ride the first two poles, then cavaletti at a trot. Then bring the horse to a walk and ride the last two poles.
- Rotate the poles 90 degrees in relation to the center line. Two poles between F and K, four cavaletti on X and two poles on M and H. The distance between the poles is kept at 1,3 m. Work on the center line, keep the rhythm and momentum.
Performance:
A horse’s balance will improve in just a few sessions using Cavaletti. The horse will be able to carry himself more confidently and raise his legs higher.

Maximum concentration and perfect systematicity is the key to success.
1.2
Equipment:
7 poles, preferably long and colored.
Placement Tips:
The first pole on the letter X, at an angle of 90 degrees to the center line. Next, we install four more poles, on both sides of the first, at a distance of 1,30 m from each other and from X. We leave a gap between them of 60-70 cm. Then we put two more poles perpendicular to the center line and parallel to the first pole (the distance is the same – 1,30 m).
Goal: This exercise may look simple enough, but it requires a lot of skill and focus from rider and horse. First, to get the hang of it, practice on the outside line (two poles). Next, we ride along the center line: here the task becomes more complicated – you will need to align the horse in the center with your legs. After that, start riding on 5 poles. Both you and the horse will need self-control, focus and clarity of messages.
Performance:
- Raise your horse into a trot and step onto the two poles on the outer edge. The distance between them should be 2,6 meters. The horse will do two beats instead of one.
- Go back and ride on the center line for 3 poles. The distance between them is 2,60 meters.
- Finally, we run five poles to the left or right of the center line. Here the distance is one measure of the trot.
Expert Comments Ingrid: To make the training interesting for the horse, you need to change tasks more often. Different distances and approaches force the horse to be more attentive to the commands of the rider. Cornelia: This is my favorite exercise! These outdoor poles are a great workout! They stimulate the horse to get to work faster. Riding the center line was a challenge for me. How well does my horse respond to leg action? Can I make her move in a straight line? And, finally, not the line with five poles, I gave my best.
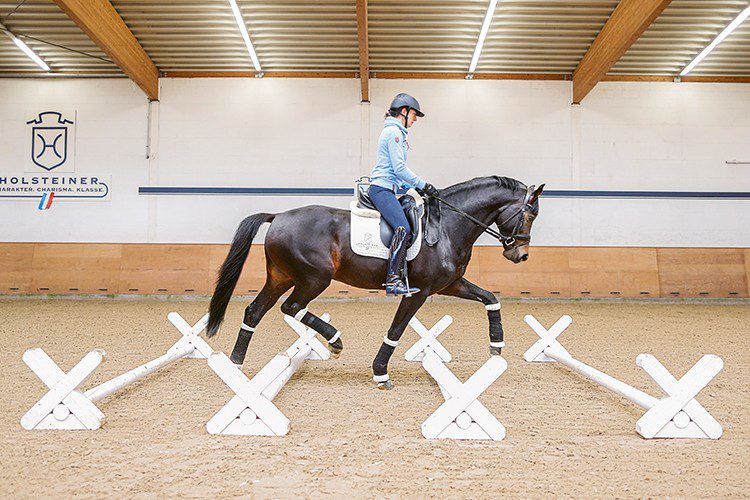
2 – BREAKING CORRIDOR
2.1
Equipment: 6 places or 4 places, 2 cavaletti.
Placement Tips:
Set up three pairs of poles parallel to each other along a diagonal line. Try to keep the distance between the couples the same. Place the central pair on the letter X.
Goal: This scheme can be used very effectively throughout the lesson at different levels of preparation. Curved line riding combined with pole riding improves contact and conduction. Riding in a diagonal line between the poles gives the rider the opportunity to work with the legs, aligning the horse not with the reins, but using the legs. You can also work with transitions. Bring your horse to a walk or stop when you are between the poles. But keep in mind: three transitions over the diagonal are tiring for the horse. Do not overdo it!
Performance:
- During the warm-up, try to ride on curved lines, go on the poles.
- Toward the end of the warm-up, work diagonally, practice with simple transitions (trot-walk-trot). The transition can be performed both between poles and after.
- Work with more complex transitions: canter-step-canter.
- Intermediate and above: Change when the horse is between the poles. To prevent the horse from stepping on the pole, you may need to increase the distance between them to 1,6 meters so that the horse does not step on the pole.
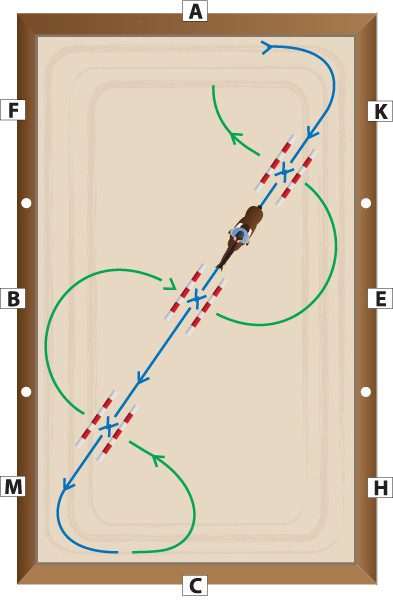
The green line is a warm-up. The blue line is the recommended transition points.

The pole corridor is an easy and effective way to teach your horse transitions such as trot-walk-trot. The horse learns to make the transition clearly at a particular point, to remain straight.

Tips on the ground help the horse stay straight.
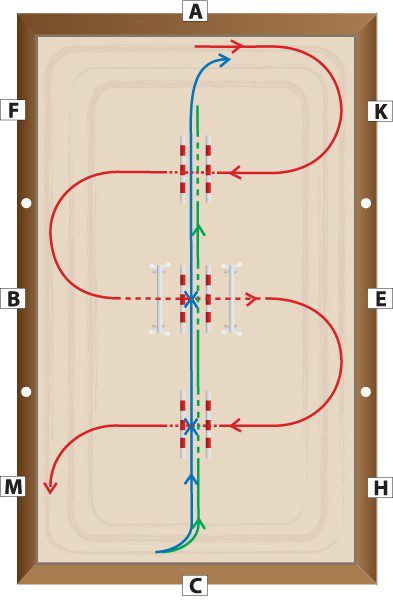
2.2
Equipment: 10 poles. Or 6 poles and 4 cavaletti on the right.
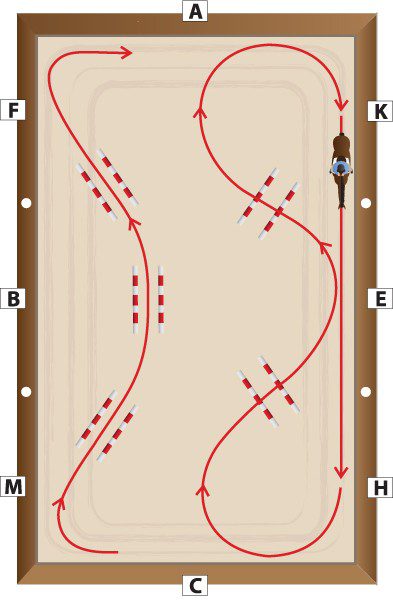
Placement Tips: Place six poles to form a single loop serpentine corridor along the long wall of the arena. The distance between the poles is 1 m. On the opposite side, we install two pairs of poles (distance – 1,3 m) so that you can ride on them, performing left back and right back.
Goal: Frequent shifting from rein to rein will help the horse become more supple and balanced, helping to eliminate stiffness. By alternating between riding in the corridor and riding on the poles, the horse will focus on your commands and develop a natural rhythm of movement.
Performance:
- Through the poles opposite the letter B, go to the long wall to the right, in the corner we do back to the right, we pass the poles, we return to the wall, we go to the left corner and we do back to the left, passing along the poles. We pass the poles in a training landing.
- We are going in the corridor between three pairs of poles. We make a transition to a step between the poles opposite the letter B, then, on the next run, we make transitions between two pairs of letters M and F.
- On the long wall from the side of the letter E we go along the poles, making transitions in a step after the poles.
- For an advanced level: on C – gallop to the right. We ride along the serpentine in the corridor of three pairs of poles without changing the leg (there is a counter canter).
- On the long wall from the side of the letter E, we remove one pole from the pairs. We make a change of legs at a gallop, passing through a pole. We go to the wall, change direction in the corner and again perform the change through the pole.
Expert Comments
Ingrid:
Trotting the poles in curved lines helps bend the horse. Changes are very useful, because in order to make a change in a certain place, you must clearly control the horse.
Cornelia:
These charts are a test for your horse. It is easier to work at a trot than at a canter. Over time, you will learn how much leg you need to control the horse, bend it or keep it straight.
3. TURNS AND BENDS
Equipment:
6 poles (see diagram) or 8-10 in an arena 20×60.
Placement Tips:
The poles are placed in a V-shape along the center line. The distance from center to center of each pole is 2,6 m. Leave a gap of 3,9 m and set the next V. To center the horse when doing serpentines, two additional guide poles can be placed at each corner.
Goal: These few poles make it possible to perform many bending exercises. Say goodbye to rigidity! Frequent changes from rein to rein will build elasticity and flexibility in your horse. You can ride continuous arcs (red line) or serpentines, as in standard dressage riding (blue line). Depending on the level of training of your horse, you can work both at a trot and at a canter. The horse focuses better on the change. This exercise also builds your horse’s confidence.
Performance:
- Include in the work and movement along the center line at the trot (green line). The horse must understand the leg, and you must be able to use it.


Serpentine through the sharp end of the V pole was no problem for 4 year old Damon Holsteiner from Damon Hill. The extra guide poles installed in the early stages made it easier for the horse to complete the task.
Expert Comments
Ingrid: Any serpentine is of great importance in learning, done land it is S-shaped loops or straight. Both you and the horse learn to work with two reins. Riding on V-shaped poles helps to develop an eye and correctly assess the distance.
Cornelia: This exercise was the most interesting. At first I realized that it was quite difficult to keep the horse right in front of the sharp end of the V. With two hints it became easier. The horse sorted out, relaxed and I felt that contact and conduction appeared.
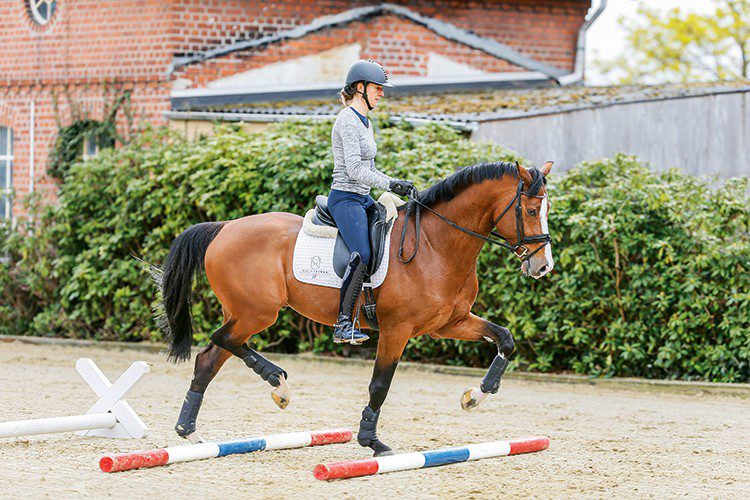
4. GALLOP TIME
Equipment:
2 poles, 3 cavaletti. Addition: Cavaletti can be placed at an average height of 25-30 cm.
Placement Tips: Position one pole at a 90 degree angle to the long diagonal before entering the corner. On the other side, set up a pole that lies in the path of your movement to the left and back from the corner. Then along the same long wall set up 2 or 3 canter cavaletti at a distance of 3 – 3,2 m.
Goal: This chart is useful for horses that have difficulty taking changes. The poles are placed in such a way that the horse cannot rush. An added bonus: the poles act as a fixed point for the change of foot, making it easier for both horse and rider.
Performance:
- The poles in the corners can be used during the warm-up, at the walk, at the trot, and also for walk-trot transitions.
- Drive into a corner to cool off a hot horse.
- The pole on F can be used when making a long diagonal change.
- The combination of corner poles and cavaletti sharpen the horse’s attention. Please note: follow the red line first, the green line is more difficult.

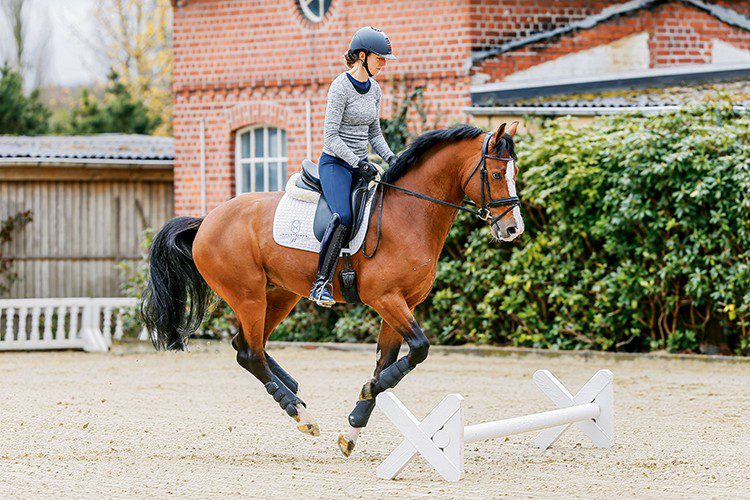
The stallion demonstrates the active work of the hindquarters, which is stimulated by Cavaletti.
Expert Comments
Ingrid: Not every coach uses poles to practice changes. However, my practice shows that such training is always effective. The horse changes the order of legs in the suspension phase. Some horses find it difficult to get their legs sorted out so quickly. Single poles can be medicine. The main thing is not to rush.
Cornelia: Canter pole work requires a certain level of skill and balance from the rider. Not every combination is easy to maintain the right rhythm, let alone changes. I suggest starting work without changes – you can practice them when you gain experience.
Distances and Helpful Hints
Standard distances for cavaletti: Step: 0,8-0,9 m. Lynx: 1,3-1,4 m. Gallop: 3,0-3,2 m.
Calculate the correct distance based on your horse’s stride length in all three gaits. In the future, poles can be used to work on changing the stride length. Some riders even practice preparing for the piaffe on cavaletti 20-30 cm tall.
Kerstin Nieman; translation by Valeria Smirnova (source). Photographs by Jacques Toffy.


You May Also Like
Mounting
How to work in a circle