About some exercises for the gymnastic training of the horse
About some exercises for the gymnastic training of the horse
The gymnastic exercises described in our article are suitable for both sport horses and hobby class horses, however, we note that they should be offered to animals that already have some jumping experience, calmly entering obstacles.
Preliminary Tips
Throughout the training session, the horse must be in a confident, balanced state, otherwise your exercises will not bring the expected quick and lasting effect.
It is advisable to perform exercises at a calm, rhythmic pace, with a soft, almost imperceptible influence of the reins – this will help awaken the initiative on the part of the horse.
When working with a horse on the rows, try not to interfere, be a smart “passenger” for her. After the horse has entered the first obstacle, he will have to organize the work of his legs and body in order to overcome it. Your task at this moment will not interfere.
If you have difficulty while working on the exercise, you will need to either lower the obstacles, or remove the last one and lower the remaining ones. You can only raise the barriers again or add new ones to the row when the horse is confidently moving forward again.
Your goal should be to develop in the horse the ability to independently maintain rhythm, pace and balance when overcoming obstacles, to balance himself without relying on the rider.
Great addition to the exercises for you personally can become a count of pace during the passage of a series. For example, if there are a couple of obstacles in a row through the pace, then on landing, say “ground”. Then, when the horse makes a gallop pace between the barriers – “one”, the next stage – the horse goes into the take-off phase to the next obstacle. Keep counting on and on. The horse in the row should maintain a steady rhythm, and so should your counting.
To your surprise, you may find yourself unable to count in the same rhythm as your horse. We also note that this surprise awaits very many. The fact is that riders who find it difficult to perform this exercise, as a rule, have problems with landing, leading to loss of balance. When they lose their balance, they become distracted because they are forced to think more about themselves than about maintaining balance and rhythm in the landing phase. In most cases, leg and foot positions need to be corrected.
Riders who show anxiety while jumping will notice that their tone of voice rises as they count.
Practice keeping your eyes on each next barrier in your path. So, if you are riding a pole, look at the middle of the pole until it disappears from your field of vision, hiding between the horse’s ears. This will help you stay in a straight line and teach you how to relate what you see to what you feel – the pace of the canter with varying distance to the obstacle, the phases of the jump, and the jump itself.
Young horses and inexperienced riders should not be required to change the horse’s stride when entering the pole. Whether the horse takes a longer step or adds one short step is irrelevant. If she touches or steps on the pole, that’s fine too: the horse will get a negative experience and will most likely be more careful next time. If the horse continues to cling to the poles, then an inexperienced rider interferes with his work. This shouldn’t happen!
If the obstacle is after the poles, ride the poles at a posting trot and then gently and smoothly into the saddle. This will put you in maximum contact with the horse’s body during the take-off phase.
Do not lean forward while riding the Cavaletti or passing the poles.
When the horse pushes against the barrier, do not move the body forward – you should feel how the withers themselves rise towards you.
When collecting a horse for gymnastic work, do not forget to put on boots and, if necessary, bells. While the horse is learning to coordinate his legs, this will help keep him safe from injury.
Exercise 1.
This gymnastic exercise is intended for preliminary work with the horse and does not involve jumping. You will need to emphasize the rhythm of the horse’s trot, as well as its calmness and relaxation when passing the cavaletti. The horse must relax the muscles of the back, lower the neck and head to look at the poles, stretch along the top line.
The four blocks of poles needed to complete the exercise are freely placed in an arena measuring 25 by 45 m.
The total time for performing the exercises, including breaks per step, should not exceed 45 minutes.
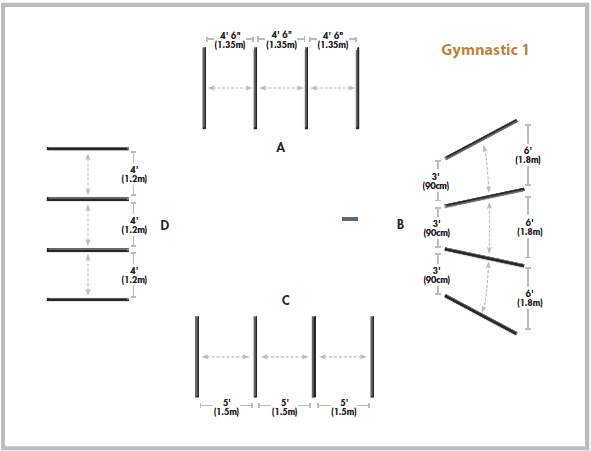
1.1 After you have warmed up the horse at the walk, trot and canter, trot into the block of poles “A” (see diagram). Cavaletti set in this order will encourage the horse to move into a working trot.
If your horse has little experience with cavaletti, the exercise may be too difficult for him: move the first and third poles to the center of the arena. You will be left with two poles with a distance of 2,7 m between them. Once the horse has completed the light task and is able to balance itself in the trot, you can put the poles back on.
Work the poles in both directions as shown in the diagram. After the horse learns to confidently, evenly and rhythmically overcome the “A” block, you can proceed to work with the “B” block.
1.2 Start at the posting trot, in a circle, in any direction. When entering Block B, follow the trajectory so that the stride length at trot is the same as the stride length shown in Block A.
After both you and the horse are familiar with the task, change the trajectory and pass the poles closer to the center of the arena, where the distance between them is narrower. Then work closer to the wall where the distance is wider. This will force the horse to change frame at the trot, shorten and move forward. If the horse trots two steps between the poles or breaks into a canter, you’ve probably asked for too much bending.
You can try to enter the block from a narrow edge and exit from a wide one. The horse will initially be forced to narrow the steps, and then, as the block progresses, to widen them.
After working in both directions on the “B” block, you can move on to the “C” block.
1.3 The poles of the “C” block are placed in such a way that the horse will need to widen his strides. You may find that the horse does not have enough stride length on the last pole to reach and cross it. Remove the last pole and continue the exercise without it. After a couple of days of work, try to return it to its place. If you performed the exercises correctly, then by this time the horse should have acquired the necessary physical form and will easily overcome all four poles.
Work with the “C” block until the horse is stabilized. After a short break, move on to block “D”.
1.4 The poles of this block are 1,2 m apart, which will require the horse to move into a collected trot. You can ride in both training and posting positions, although until the horse balances and develops a clear rhythm through these poles, it is better to opt for the posting. The posting trot gives the horse the opportunity to raise his back, in addition, this type of seat is easier for the rider.
Work in both directions until the horse relaxes and trots evenly over the poles. There should be no failures when entering the block. The horse will need to show a clear trot without a hitch.
After another break, you can tie all four blocks together. This will be helpful in improving your horse’s suppleness and suppleness.
Go to block “A”, then, in an arc, to block “B”, so that the distance of steps decreases (from the outer edge to the inner). Proceed to the “C” block, expanding the frame, and then to the “D” block, narrowing it.
If the horse has difficulty, limit yourself to blocks A, B, and C.
You can do a circle in the center of the arena after the “C” block, and then enter the “D” block.
If the horse does a good job, praise it and walk. While walking, plan a new route for work. Resume the trot and change direction. Now you will pass the blocks in reverse: “A”, “D”, “C” and “B”.
While working on this exercise, you may experience Errors.
If the horse lunges forward when approaching the C block, lead him there either from the narrow edge of the B block or from the D block. This will cause the horse to collect before entering block C and not build up speed.
If the horse is jerky or lazy, work on the B block by riding in from the narrow end and working towards the wide end. So she will learn to increase her steps.
Exercise 2.
This exercise introduces the horse to the technique of overcoming obstacles in the rows.
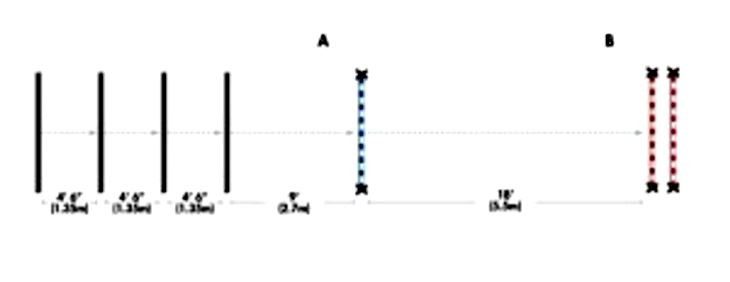
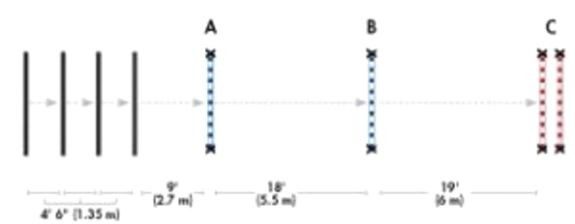
Lay four parallel poles on the ground at a distance of 1,35 m from each other. At a distance of 2,7 m from them, lay another pole (later it will be transformed into a chukhonets). The photo shows the final version of the row, which originates from five poles located on the ground.
The complication is gradual. You should be prepared to repeat each variation of the series several times until you feel that the horse is easily and confidently overcoming it. Do not add the next element until the horse balances on the previous ones.

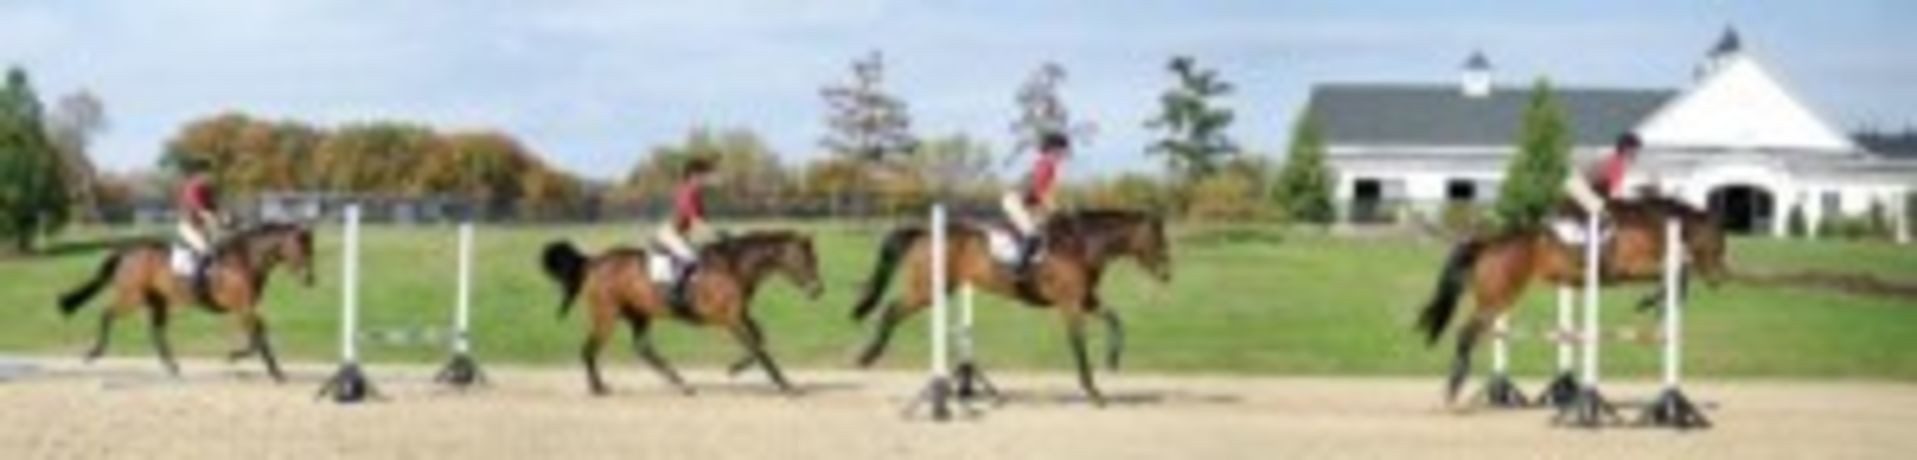
Let’s analyze the picture.
We see how the rider overcomes the poles. She sits in saddle contact phase at a posting trot. The angle between her hip and knee is 90º. This suggests that her stirrups are adjusted correctly. The line from the elbow to the horse’s mouth is straight. The rider looks ahead of her. She is calm and attentive, ready to jump over the Chukhonian.
Next, we observe the moment of repulsion. The rider’s elbows are closed, and it seems that there are no unnecessary movements. At the next moment – the approach to the oxer – I would like to see the rider sitting in the saddle. But, judging by the photo, both the rider and the horse are confident and balanced, so the half landing did not affect the quality of the jump. The stirrups are vertical, the rider’s back is slightly arched, the line from the elbow to the mouth is straight, the gaze is directed forward.
We look at the final moment – a jump through the oxer. The rider obviously overdid it. Look at the angle between her body and the ground. She leaned very hard towards the horse. This prevented maintaining contact with the mouth – the elbow-snaffle line is broken.
When overcoming an obstacle up to a meter, the rider needs to slightly tear off the seat from the saddle, the horse will come to you with the withers, there is no need to move the body forward so much!
Trot five poles in both directions to show your horse the distance and let him develop rhythm and balance. Then, in order to stretch the horse, you can raise the fifth pole, making a 45-60 cm high pole. Now overcome the row from the poles towards the hood. Repeat this exercise several times.
When the horse is confident and calm in crossing the row, you can gradually bring the pole to B into the work, forming from it another snuff. Don’t make it higher than A.
As the horse progresses through the row, you can gradually increase it until the height of one of its elements is 10 cm higher than the height you usually overcome in tournaments.
Before adding an element to the row, omit the previous element to maintain confidence in your horse.
A row can be made more complex or higher, but never complex and high at the same time. The performance of your horse is the decisive indicator of how quickly we can raise the height of obstacles.
Whether your horse has experience in gymnastic rows or not, the number of runs on the full version of the row should not exceed six at a time to begin with. After that, you can be distracted by any other light work on the parade ground, and then return and go through the row again four to six times.
Before setting up the oxer, make sure the horse is moving easily and confidently in the row. The oxer should be slightly taller than the Chukhon and, to begin with, be no more than 60 cm wide. In order for the horse to see in advance that the last obstacle in the row is the oxer, set the front pole a little lower than the back. Go through the row with this modification several times.
Both the height and width of the obstacle can be increased only after the horse has completed the task already set.
Exercise 3.
This exercise will allow you to continue the work already started.
Now at point B we will install a chukhonets, and at a distance of 6 meters from it – an oxer.
Let’s start with exercise 2, having previously removed the poles from points B and C (we will leave only the posts and five poles on the ground). After warming up the horse, trot the poles several times in both directions.
Then build a chink on A, go through the row a couple of times and level up the chink. Before adding the chink on B, lower the chink A if its height is equal to the height you overcome in the competition.
You can line up a row according to the following scheme: the height of the Finn A is 60 cm, the height of the Finn B is 90 cm and C is 1 meter (when we raise the pole to C, we first build the Finn, and only then – the oxer 90-100 cm high).
The gymnastic row is overcome in a straight line, in the center. But the horse in the photo is still young, so the rider had to adjust the side flail when entering the first Chukhonian.
Our proposed heights are advisory in nature. You have to raise the height of the obstacles based on your horse, looking at how he goes through the course. If she gets nervous and starts throwing herself at the barrier, lower the height or remove the last obstacle. Continue to work calmly and confidently until the horse is up to the task and calms down.
If you feel that the horse is losing confidence as the height increases, lower the height and narrow the oxer.
The distances between obstacles A, B and C are planned in such a way that between them the horse can make one stride of the canter. If the horse comes too close to B or C, place the poles centered between obstacles A and B and B and C. This will help the horse orient himself. Continue to increase the height and width of the oxers gradually as the horse develops his skill and improves his fitness.
Jim Wofford; translation by Valeria Smirnova (based on materials from foreign Internet resources).


You May Also Like
Four common hand problems and how to fix them
We teach the horse to turn in front